1 · Setting up the project
About 30 minutes
Image: public domain, via Wikimedia Commons.

By the end of this chapter you'll have a running Django project with one model, a
Study, that you can add to and edit through Django's built-in admin.
Create the project
Go into your terminal and find somewhere you want to save your project (e.g. ~/projects).
Make a folder, start a uv project inside it, then let uv and Django make the skeleton of your project for you:
# somewhere to keep everything
mkdir behavioural-study && cd behavioural-study

# start a uv project (writes pyproject.toml)
uv init --python 3.14

# add Django as a dependency
uv add "django>=6.1,<6.2"

# the project is "config"; the dot keeps manage.py here
uv run django-admin startproject config .

# our app, where the study code lives
uv run python manage.py startapp study
On Windows
mkdir and cd are the same on Windows, but chaining them with && only works in
the newer PowerShell 7
(and in the old cmd.exe). In Windows PowerShell 5.1, the one that comes with
Windows, run them as two lines instead:
Paths differ too: ~/projects becomes C:\Users\you\projects.
Other commands in this tutorial start
with uv run, which are identical on Windows, macOS and Linux.
Why django-admin for one command and manage.py for the next?
They run the same underlying Django machinery, so having two commands looks a bit inconsistent. The reason is
that manage.py doesn't exist yet (startproject is the command
that creates this file). So for commands you have to run before you have created your project, use django-admin;
everything after (startapp, migrate, runserver), use manage.py.
Those commands leave you with this project structure:
behavioural-study/
├── config/                 project-wide settings and URL routing
│   ├── __init__.py
│   ├── asgi.py
│   ├── settings.py         INSTALLED_APPS lives here
│   ├── urls.py             the project's URL map
│   └── wsgi.py
├── study/                  the app you'll build in this tutorial
│   ├── migrations/
│   │   └── __init__.py
│   ├── __init__.py
│   ├── admin.py
│   ├── apps.py
│   ├── models.py
│   ├── tests.py
│   └── views.py
├── .gitignore
├── .python-version
├── main.py                 the sample file from `uv init`; delete it
├── manage.py               how you run Django's commands
├── pyproject.toml          your dependencies
├── README.md
└── uv.lock
uv init also made a sample main.py, which Django doesn't need, so delete it. It also started a git repository. Add the line db.sqlite3 to its .gitignore now (as in the finished app's .gitignore): the database will soon hold participant data, which should never be committed alongside your code.
What's a git repository, and why put it online?
Git keeps a history of your project. Each time you commit,
any changes in your files you are tracking are noted, with a short message saying
what changed. The repository is that history, stored in a hidden .git folder
inside your project. If you break something at a later point, git lets you find out
what you did, or change and go back to a version that worked earlier. The
.gitignore file lists what git should leave out, which is why the database goes
in it.
Right now that history lives only on your computer. A remote repository is a copy of it on a service such as GitHub, GitLab or Codeberg, and it's well worth having one:
- If your laptop dies, your code and its whole history are safe
- Collaborators can pull your changes and send you theirs
- Most hosting services build your app straight from a remote repository, so
publishing an update is just a
git push - You can make the repository public and cite it in your paper, so others can see exactly how your study was run
Note that the config/ folder holds project-wide settings and how the URLs link up to the separate apps (this is called 'routing'). The study/
folder contains the Study app that we'll be developing. We need to tell Django that the study app exists by adding it to
INSTALLED_APPS in config/settings.py:
The first model
A model is a Python class that describes a database table. Our first table, Study, is for defining
our studies. Open study/models.py. Django created this for you automatically, along with this line of code at the top of the file:
from django.db import models. Below this, add:
class Study(models.Model):
    """A single experiment a researcher wants to host and collect data for.

    jsPsych *timeline* code will end up being stored in `code`; the
    platform takes this and wraps it with the jsPsych library and the data-capture plumbing when it serves the study. Media assets (images, sounds) are hosted externally by the
    researcher and referenced by absolute HTTPS URL from within `code`.
    """

    name = models.CharField(max_length=200, help_text="Human-readable study title, e.g. 'Flanker task'.")

    # A slug is a short label built only from letters, numbers, hyphens and
    # underscores. These characters are safe in URLs.
    slug = models.SlugField(
        unique=True,
        help_text="Short URL-safe identifier; appears in the study URL, e.g. /study/flanker/.",
    )
    # blank=True lets a study be saved before its code is written. default="" rather than
    # null=True, so "no code" has one spelling in the database (an empty string), not two.
    code = models.TextField(
        blank=True, default="", help_text="The researcher's jsPsych timeline code (JavaScript)."
    )
    created = models.DateTimeField(auto_now_add=True)

    class Meta:
        verbose_name_plural = "studies"
        ordering = ["-created"]

    def __str__(self):
        return self.name
A few things worth noticing:
- Each attribute of the class (name, slug, code, created) becomes a column in our table. A
slugis the short, URL-safe name that will appear in the study's address, like/study/flanker/ codeis where the researcher's pasted jsPsych timeline lives. It's aTextFieldbecause it needs to be able to hold a long string of characters (see Django's model field types).blank=Truemakes it optional, so you can save a study now and paste its code in later__str__(looks pretty crazy but) is a special method Django looks for automatically whenever it needs to show an object as text. It controls how aStudyshows up in lists (like the admin). Without it, you'd seeStudy object (1)(e.g. in the admin section), which is as useful as a kick in the head
Wire up the admin
Django autogenerates for you a full admin interface if you spend a moment telling it which models you want to see. Replace the contents of study/admin.py with:
from django.contrib import admin
from .models import Study

@admin.register(Study)
class StudyAdmin(admin.ModelAdmin):
    list_display = ["name", "slug", "created"]
    prepopulated_fields = {"slug": ["name"]}  # fills in the slug from the name as you type
Those few lines get you what's shown below: a full web interface where you can add, edit and delete rows in your database to your heart's content! Super powerful!
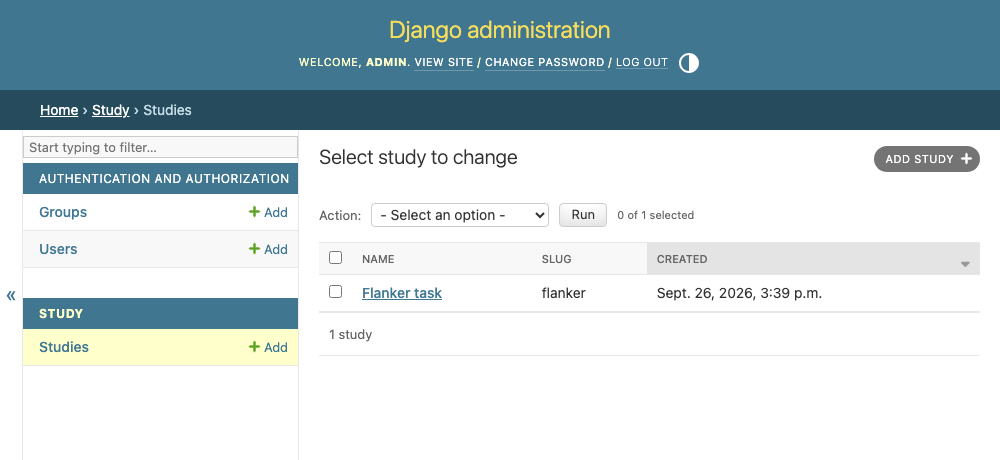
The admin is only for you!
Getting into the admin requires an account with staff status, and what you see there is the whole model, laid out Django's way, with the ability to add, delete, and edit. It is better to give collaborators (or participants) a bespoke page containing a form with more limited permissions. To see this in action, check out Registering studies (forms) in Going further.
Create the database and log in
The Study model that we made above describes your data relationships. You use makemigrations to generate code which is used (via migrate) to turn that description into the actual database table. Each time you change your models, you need to make new migration files (via makemigrations) and update the database (via migrate). This seems tedious, but it's one of Django's great features: makemigrations writes the migration from your model changes automatically, and because the migration files are committed alongside your code, your database schema travels with the project. Anyone who clones your project gets the same tables.
uv run python manage.py makemigrations   # writes the migration file from your model
uv run python manage.py migrate          # applies it to the database
Let's also create a login for you and start the server:
uv run python manage.py createsuperuser  # make yourself an admin login
uv run python manage.py runserver
Checkpoint
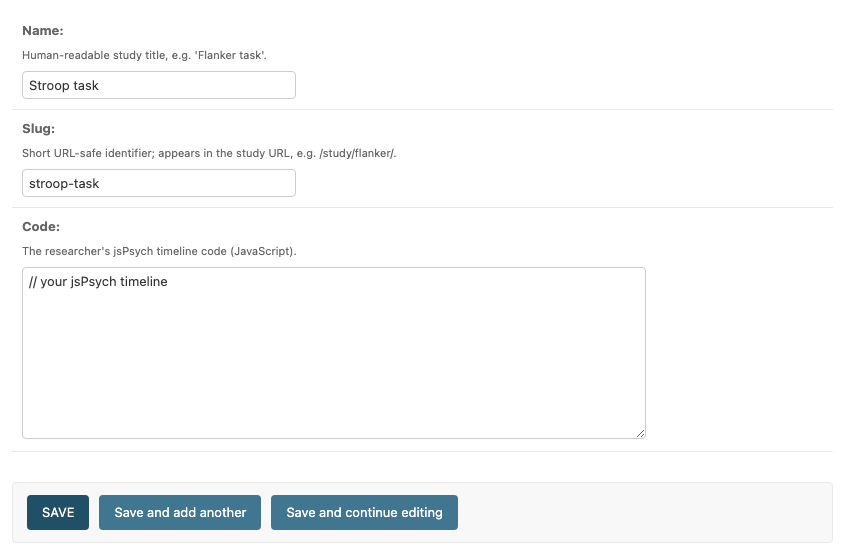
Open http://127.0.0.1:8000/admin/, log in, and you'll find Studies, the screen you saw above. Click Add study and type a name. Watch the slug fill itself in as you go. Put anything in Code for now (you'll add a JsPsych study timeline in the next chapter), then click save. You've now got a model, a database table, and have a way to add/delete/edit studies.
Next, we make a study actually do something by serving it to the browser.